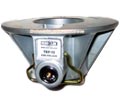
Slack Adjuster Puller 10406, 10407, 10409, 10410
For Heavy Duty (Class 7, 8)


Slack Adjuster Puller - Manual 10406
Slack Adjuster Puller - Rockwell Auto 10407
Slack Adjuster Puller -Gunite/Brunner/Bendix 10409
Slack Adjuster Puller - Haldex Multi Adjustable 10410
Safely and efficiently removes Manual, Rockwell, Gunite, Brunner and Bendix slack adjusters. Haldex multi adjustable slack removes self adjusting slack virtually including left & right offset, and standard elongated arm designs from either side.
Features
- Eliminates cutting torch & hammering methods
- High strength steel casting
- Designed for high capacity pulling
- Can be used with a 1/2" impact tool.
- Simple to slip on for instant results
- 10406 - Manual Slack Adjuster
- Fits virtually all makes and models of manual type slack adjusters.
- 4.5" max glove opening
- 10407 - Rockwell Slack Adjuster
- Fits virtually all Rockwell self-adjusting slack adjusters w/ a depth 2.75"
- 10409 - Gunite/Brunner/Bendix Slack Adjuster
- Can service virtually all Gunite, Brunner and Bendix self-adjusting slack adjusters.
- 10410 - Haldex Multi Adjustable Slack Adjuster
- accommodates the removal of virtually all haldex self-adjusting slack adjusters including:
- Left offset
- Right offset
- Standard elongated arm designs from either side
- 2.5" arm length
- accommodates the removal of virtually all haldex self-adjusting slack adjusters including:
10406 - Manual Slack Adjuster Operating Instructions
Note: Threads must be clean and well lubricated at all times. Do not use over 1⁄2" impact wrench. Doing so will void warranty
- Remove clevis pin from the end of the slack adjuster with the Tiger Tool 10501 Brake Clevis Pin Press
- With the forcing screw and the forcing screw backed fully out, slip the puller onto the slack adjuster.
- Turn the forcing screw by hand or with an impact wrench.
- Slack adjuster will drop off when free.
10407 - Rockwell Slack Adjuster Operating Instructions
Note: Threads must be clean and well lubricated at all times. Do not use over 1⁄2" impact wrench. Doing so will void warranty
- Remove clevis pin from the end of the slack adjuster with the Tiger Tool 10501 Brake Clevis Pin Press. Remove the slack adjuster rod from the slack adjuster with the Tiger Tool 10502 Slack Adjuster Rod Pin Press.
- Back out the forcing screw. Slip the puller onto the Slack Adjuster. Align the tip of the forcing screw with the center of the s-cam.
- Attach the tool to the slack adjuster through the clevis hole using the supplied hardware.
- Turn the forcing screw by hand or with an impact wrench.
- Hold the puller and slack adjuster to keep it from falling to the ground.
10409 - Gunite/Brunner/Bendix Slack Adjuster Operating Instructions
Note: Threads must be clean and well lubricated at all times. Do not use over 1⁄2" impact wrench. Doing so will void warranty
- Remove clevis pin from the end of the slack adjuster with the Tiger Tool 10501 Brake Clevis Pin Press. Remove the slack adjuster rod from the slack adjuster with the Tiger Tool 10502 Slack Adjuster Rod Pin Press.
- Back out the forcing screw. Slip the puller onto the Slack Adjuster. Align the tip of the forcing screw with the center of the s-cam.
- Attach the tool to the slack adjuster through the clevis hole using the supplied hardware.
- Turn the forcing screw by hand or with an impact wrench.
- Hold the puller and slack adjuster to keep it from falling to the ground.
10410 - Haldex Multi Adjustable Automatic Slack Adjuster Operating Instructions
Note: Threads must be clean and well lubricated at all times. Do not use over 1⁄2" impact wrench. Doing so will void warranty
- Remove clevis pin from the end of the slack adjuster with the Tiger Tool 10501 Brake Clevis Pin Press. Remove the slack adjuster rod from the slack adjuster with the Tiger Tool 10502 Slack Adjuster Rod Pin Press.
- Select the bent or straight arm and attach to the main puller body with the 1⁄2" x 1" bolt supplied. Do not tighten at this time. Note: straight arm is for older style Haldex slacks. The bent arm is for newer angled and/or offset Haldex slack adjusters.
- Back out the forcing screw, slip the puller onto the slack adjuster. Align the tip of the forcing screw with the center of the s-cam.
- Secure the selected arm to the slack adjuster through the clevis hole using supplied 1⁄2" x 2 1⁄2" hardware.
- Tighten 1⁄2" x 1" and 1⁄2" x 2 1⁄2" bolts to securely mount the puller to the slack adjuster.
- Turn the forcing screw by hand or with an impact wrench.
- Hold the puller and slack adjuster to keep it from falling to the ground.
Warranty Policy
Tiger Tool International Incorporated (“Tiger Tool”) warrants to its customers that cast portions of its tools are free from defects in workmanship and materials for as long as the original purchaser owns the tool.
Tiger Tool warrants to its customers that threaded areas, bolts and machined components in or of its tools will not fail due to defects in workmanship and materials for a warranty period of two years from the date of original purchase.
Tiger Tool warrants to its customers that hydraulic components will not fail due to defects in workmanship and materials for a warranty period of one year from the date of original purchase.
For warranty service a customer must return the tool freight prepaid along with original proof of purchase to TIGER TOOL INTERNATIONAL INCORPORATED.
When a customer seeks warranty service with respect to a tool and that tool is covered by a TIGER TOOL warranty, TIGER TOOL may at its option repair the tool, replace the tool or refund the purchase price for the tool.
New unused product that is returned to tiger tool as a result of the customers error or due to inventory adjustment will be subject to a twenty percent (20%) restock/rework fee with authorized RGA number otherwise a 30% restocking fee will apply.
Highly Recommended
Track Your Order


